Please note: Information in this guide is based on our research at time of writing and is subject to change. Always consult a licensed plumber for diagnosis of serious plumbing issues before attempting repairs.
Introduction
A garbage disposal that smells is one of the most common kitchen complaints homeowners report — and in almost every case the cause is trapped food residue, not a mechanical problem. The odor originates in places a standard water rinse never reaches: under the rubber splash guard, inside the grind chamber, and along the walls of the drain line just below the unit. The good news is that a thorough cleaning takes about 10 minutes and requires nothing beyond items most US households already keep on hand.
This guide walks through a complete cleaning routine from start to finish — covering the splash guard, the grind chamber, and a deodorizing flush — so you can eliminate the odor at the source rather than masking it. If you’re considering an upgrade after getting yours clean, our guide to the best garbage disposals covers our full picks on the market. And if your unit needs more than cleaning, see our step-by-step guide to installing a garbage disposal for a full replacement walkthrough. While you have the unit apart, our comparison of a kitchen sink strainer vs garbage disposal flange is worth a look if the seal at the sink opening itself looks worn.
At a Glance
| Difficulty |
Easy |
| Time |
10–15 Minutes |
| Cost |
Free — household items, $ for specialized cleaners |
| Tools Needed |
Ice cubes, coarse salt, baking soda, white vinegar, dish soap, old toothbrush, citrus peels |
| Skill Level |
Beginner |
✏️ Our Take
A garbage disposal that smells bad almost never means it’s broken — it means food particles are trapped somewhere the water rinse cycle doesn’t reach, usually under the splash guard or in the grind chamber itself. A proper cleaning routine takes about 10 minutes and solves the vast majority of disposal odor complaints without any chemicals stronger than baking soda and vinegar. The mistake most homeowners make is only running water through it, which rinses the visible surface but leaves buildup exactly where bacteria thrive.
Why Garbage Disposals Start to Smell
The splash guard — the rubber flap assembly at the top of the disposal opening — is the single most overlooked source of disposal odor. Food particles cling to the underside of each rubber flap where water never reaches during a normal rinse cycle. The underside stays damp, dark, and coated in organic residue, which is exactly the environment bacteria need to thrive. Most homeowners only ever see the top surface of the splash guard, not the underside where the buildup collects.
Beyond the splash guard, grease and oil residue coats the walls of the grind chamber over time. Every greasy pan rinsed over the disposal leaves a thin film that gradually builds up and traps food particles in place. Standing water in the trap below the unit can also develop bacterial growth between uses, contributing a secondary odor source that cleaning the chamber alone won’t fully address.
💡 Tip: Lift the rubber splash guard and look underneath — this is the single most overlooked spot, and it’s usually where the actual smell is coming from.
What You’ll Need
No special products are needed for routine garbage disposal cleaning. Everything on this list is a household staple:
- Ice cubes — for the grind chamber scrub
- Coarse salt — works with the ice to scour residue from the chamber walls
- Baking soda and white vinegar — for the neutralizing deodorizing flush
- Dish soap and an old toothbrush — for scrubbing the splash guard underside
- Citrus peels (lemon or orange) — for a finishing freshening rinse
For disposal comparisons and upgrade options, see our guide to the best garbage disposals.
💡 Tip: Every item on this list is something most households already have — no special disposal cleaning product is necessary for routine maintenance.
Step 1 — Turn Off Power at the Switch
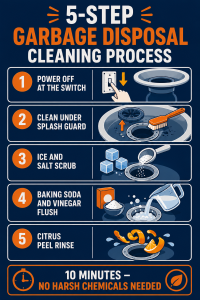
Before reaching anywhere near the disposal opening, switch off the wall switch that controls the unit. Most garbage disposals are wired to a dedicated wall switch, typically located on the counter or cabinet panel near the sink. If your disposal is plugged into an outlet under the sink, unplug it directly. Either method is acceptable — the goal is to ensure the unit cannot activate while you are working near it.
This step applies to all cleaning steps that require working near the disposal opening, including cleaning the splash guard in Step 2. Never assume the switch is off from memory — physically confirm it before starting, every time.
⚠️ Warning: Never put your hand inside a garbage disposal, even with the power switched off — the blades and grind components can still cause serious injury, and switches can occasionally be wired incorrectly. Use tools and brushes, not fingers.
Step 2 — Clean Under the Splash Guard
With the power off, lift each rubber flap of the splash guard individually and scrub the underside thoroughly with dish soap and an old toothbrush. The underside of each flap is where food residue accumulates most heavily — it stays damp and rarely gets any direct water contact during normal use. Work around the entire perimeter of the splash guard, lifting each flap section and scrubbing the surface and the underside of the rubber collar.
This step alone resolves the majority of garbage disposal odor complaints. Even if the rest of the cleaning routine is done regularly, a neglected splash guard underside will continue producing odor until it’s physically scrubbed. Splash guard access is similar whether you have a continuous feed or batch feed unit — for differences between the two, see our comparison of continuous feed vs batch feed garbage disposals.
💡 Tip: Splash guard flaps are usually removable on most models for an even more thorough clean — check your manual before pulling on them.
Step 3 — Ice and Salt Scrub Method
With the splash guard clean, restore power to the disposal and move on to the grind chamber. Pour 2 cups of ice cubes directly into the disposal, then add half a cup of coarse salt on top. Turn on the cold water at the sink to a moderate flow, then switch on the disposal and let it run until all the ice has been processed and you hear the grinding sound change to a clear running-water tone — usually 20 to 30 seconds.
The combination of ice and salt scours the interior walls of the grind chamber as the ice breaks apart under the grinding action. The ice is hard enough to dislodge stuck food residue and grease film, while the salt acts as an abrasive amplifier. This method is significantly more effective than running hot water through the unit, which can actually soften and spread grease rather than removing it. Always use cold water with this step.
💡 Tip: The combination of ice and salt scours the inside of the grind chamber as it breaks apart, dislodging residue that water alone can’t remove.
Step 4 — Baking Soda and Vinegar Flush
After the ice and salt scrub, switch the disposal off and pour half a cup of baking soda into the drain opening. Follow immediately with half a cup of white vinegar — the mixture will foam and fizz as the two react. Allow the foam to sit for 10 minutes without running any water or the disposal, then flush through with hot water and let the disposal run for 15 seconds to clear everything out.
The baking soda and vinegar reaction neutralizes odor-causing bacteria chemically rather than masking the smell. This is more effective against odors than running scented soap through the unit, and it is safe for all standard plumbing materials including PVC, ABS, and cast iron drain lines. For a comparison of disposal options that may affect your cleaning approach, see our guide to the best garbage disposals.
💡 Tip: This combination neutralizes odors chemically rather than just masking them, and it’s safe for all standard plumbing materials.
Step 5 — Citrus Peel Freshening Rinse
As a final step, run small pieces of lemon or orange peel through the disposal with the cold water running. Cut or tear the peel into pieces small enough to process easily — no larger than two or three square inches. Run the disposal with cold water flowing until the peel is fully processed, then let the water run for another 10 seconds to clear the drain.
The natural oils in citrus peel leave a clean, fresh scent inside the unit and help cut through any remaining surface grease film. This step finishes the routine and is a useful confirmation that the cleaning worked — after the previous steps, the citrus scent should come through clearly rather than competing with any residual odor from inside the unit.
💡 Tip: Don’t rely on citrus peels alone to actually clean the disposal — they freshen the scent but don’t remove the underlying buildup the way the ice, salt, baking soda and vinegar steps do.
How Often Should You Clean It
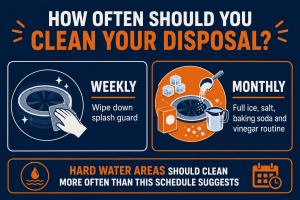
For most US households, a two-tier maintenance schedule works well: a quick splash guard wipe-down weekly using dish soap and a toothbrush, and the full cleaning routine — ice and salt, baking soda and vinegar, citrus peel — once per month. The weekly wipe prevents the underside of the splash guard from accumulating the residue layer that causes the strongest odors, while the monthly full routine keeps the grind chamber clean and odor-neutral throughout the year.
US regional note: In hard water states like Arizona, Texas, Nevada and parts of California, mineral deposits combine with trapped food residue to form a tougher buildup than in soft water regions — homeowners in these areas should clean weekly rather than monthly, and may need a vinegar soak more often to dissolve the mineral component specifically. In softer water regions like the Pacific Northwest and New England, the standard monthly schedule is generally sufficient.
💡 Tip: Set a recurring reminder on your phone — disposal cleaning is one of those tasks that’s easy to forget until the smell becomes noticeable.
Signs of a Problem Cleaning Won’t Fix
Most odor issues are solved by the cleaning routine above, but there are specific symptoms that point to a mechanical or drain line problem that cleaning alone cannot resolve. If any of the following apply after a thorough cleaning, further diagnosis is warranted:
- Persistent smell that returns within a day or two of cleaning — odor that comes back this quickly despite a proper cleaning routine usually points to a drain line issue beyond the disposal itself, such as buildup in the P-trap or further down the line
- Grinding noise without actually breaking down food — a disposal that runs but doesn’t grind effectively may have worn or damaged grinding components that no cleaning method will address
- Standing water that won’t drain at all — a fully blocked drain line or a clog below the disposal requires plumbing work, not cleaning product
If your disposal has reached the end of its service life, our guide to installing a garbage disposal covers the full replacement process from start to finish.
⚠️ Warning: A disposal that hums but doesn’t spin, or one with standing water that won’t drain even after cleaning, points to a mechanical or drain line issue beyond cleaning — further troubleshooting or a plumber may be needed.
Need a Professional Plumber?
If cleaning hasn’t resolved the odor, or you’re dealing with a disposal that hums but won’t spin, a blocked drain line, or a unit that needs full replacement, a licensed plumber is the right call. Getting a professional involved before a problem worsens is always the lower-cost outcome.
Find a licensed plumber in your area at PlumberArchive.com — the US plumber directory with 12,000+ verified local plumbers across all 50 states.
Find a trusted plumber near you → PlumberArchive.com
Follow Us on Facebook
Get weekly plumbing tips, honest tool reviews and DIY maintenance guides delivered straight to your Facebook feed. We cover kitchen plumbing, drain maintenance, disposal care and everything in between — written for US homeowners who want to handle more themselves.
Follow PlumbingToolsReview on Facebook →
Frequently Asked Questions
Q: Why does my garbage disposal smell even after I clean it?
If the smell returns quickly after cleaning, the underside of the splash guard is the first place to check — it’s the most commonly missed surface and where odor-causing bacteria accumulate fastest. If you’ve already scrubbed that thoroughly and the odor still returns within a day or two, the issue may be further down the drain line rather than in the disposal itself. Buildup in the P-trap or a partially blocked drain below the unit can produce odors that cleaning the disposal alone won’t address. A drain snake or professional drain cleaning may be needed in that case.
Q: Is it safe to use bleach in a garbage disposal?
Bleach is not recommended for garbage disposals. While a heavily diluted solution won’t cause immediate damage, regular use can degrade rubber components — including the splash guard and internal seals — over time. It also poses a risk if mixed with other cleaners already present in the drain line. The baking soda and vinegar method in this guide is more effective at neutralizing odors specifically and is safe for all standard plumbing materials and disposal components. There is no scenario in routine disposal cleaning where bleach offers an advantage over the household methods described here.
Q: Can I put ice cubes in any type of garbage disposal?
Yes — the ice and salt scrub method is safe for all standard residential garbage disposals, including both continuous feed and batch feed models. The ice is processed the same way as any other hard food item the disposal is designed to handle. The key is to use cold water rather than hot while running the ice, so the grease residue stays firm enough to be scraped away rather than liquefying. If you’re unsure which type of disposal you have, our comparison of continuous feed vs batch feed garbage disposals explains the key differences between the two.
Q: How do I know if my garbage disposal needs replacing instead of cleaning?
A disposal that benefits from cleaning will have its odor resolved — or significantly reduced — after a complete cleaning routine. If strong odor returns within one to two days of a thorough clean including the splash guard scrub, ice and salt, and baking soda and vinegar flush, a drain line problem is more likely than a disposal problem. Signs that point toward replacement rather than cleaning include a motor that hums but doesn’t spin, persistent leaking from the bottom of the unit, and grinding components that no longer break down food efficiently. A disposal in otherwise good mechanical condition can be maintained with regular cleaning for many years. See our guide to the best garbage disposals for replacement options when the time comes.
Conclusion
The overwhelming majority of garbage disposal odor complaints trace back to the splash guard, not the disposal itself — and cleaning that underside with a toothbrush and dish soap is a free, two-minute fix that most homeowners have never done. Pair that weekly habit with a monthly ice, salt, baking soda and vinegar routine and disposal odor becomes a non-issue for virtually any household.
If the smell persists after a proper cleaning or returns within a day or two, that points toward a drain line issue beyond the disposal — not a reason to replace the unit. And if the disposal is humming without spinning, failing to grind, or leaking, those symptoms point to a mechanical problem that no cleaning method will resolve.
For more on disposal options and what to look for in a replacement unit, see our guide to the best garbage disposals. If you’re installing a new unit, our step-by-step guide to installing a garbage disposal covers the full process. And if you’re deciding between disposal types for your kitchen, the comparison of continuous feed vs batch feed garbage disposals covers the key differences.
✍️ About This Guide
PTR Editorial Team — Plumbing Guides. We compare manufacturer specifications, installation requirements, compatibility and available product documentation to help homeowners choose suitable tools and parts. How we review →